SharePoint 2010: Styling the Site Actions Menu Items

I spent a whole frustrating day trying to find what styles change the hover state of the Site Actions Menu items in SharePoint 2010. I finally found a blog post that had a trick for how to get the Site Actions Menu to display on screen so that you can explore the html output in Firebug. Because the menu is generated by JavaScript, and is called by an onClick event, the menu never gets displayed in a way that you can explore in Firebug. The trick is to find the onClick event code, copy it, change the event to null, and then paste into the console-this causes the menu to display on screen and allows you to explore the menu code. The trick is fully explained here: http://blogbaris.blogspot.com/2011/03/how-to-style-sharepoint-site-actions.html

What I wanted to do is to simply remove the default hover styling from the menu items and apply my own. I was finally able to change the hover states with this code:

/* Site Actions Menu Items: changes the hover background of menu items */
div.ms-MenuUIPopupScreen div.ms-MenuUIPopupInner ul.ms-MenuUIUL div.ms-MenuUIULItemHover
{
border-color:#274E61;
background-image:none;
background-color:#F7E6D7;
}

It is easier to change the Site Actions menu button since it displays on screen without JavaScript. I used the following code:

/* Site Actions Menu button: change hover background of Site Actions button */
.ms-siteactionsmenuhover{
border-color:#274E61 !important;
background-image:none !important;
background-color:#478eaf !important;

}

/* Site Actions Menu Button: removes the border from the button in the off state */
.ms-siteactionsmenu {
border-color:none !important; 
}

All of these code changes produced this:
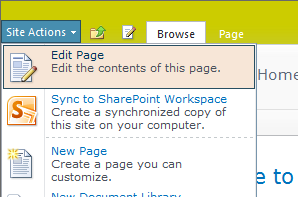
Site Actions Menu

NOTE: The code above will change the hover state for not only the Site Actions menu items, but also the Welcome menu items and the list item drop menu items.

Starting a SharePoint 2010 Branding Project: Using v4.master as base

There are several ways that you can pursue a branding project with SharePoint 2010. You can use one of the new themes, override existing styles with a new css file, alter an existing masterpage, or go completely custom. For this series of posts I will share how I go about altering an existing masterpage and styles.

Make a copy of the v4.master
Open the v4.master in Designer and do a save as. Save the new file as something different, such as custom.master, and then open it in Designer. Make sure the file is checked out before you start editing it.

Create a custom css file
Create a new css file and save it to a location that makes sense to you. You can save it to the Styles library, or on the server in the 14 hive, or anywhere that is accessible.

Create a changes.txt file
Use this file to record changes made to the masterpage as well as to paste in any controls that have been removed from the masterpage.

Link to the new css file in your copy of the masterpage:
Paste the following code into the HEAD of the masterpage and change the link to refer to your custom css file:

<!-- custom css -->
<SharePoint:CssRegistration name="http://spimages.stei.com/sp2010/styles_senet03.css" After="corev4.css" runat="server"/>

This code assures that your custom styles will always be able to override the corev4 styles.

Apply your custom masterpage to a site

Right-click on the new masterpage and select Set as Default Masterpage. You will only be able to preview fully your masterpage changes if the custom masterpage is applied to a site. Make sure that after each change you save the masterpage, check it in and then approve it. Make sure to check the file out before editing it again.

Now you can start altering the masterpage and overriding the css.

JQuery Tip: Use JQuery to alter css

This is a quick tip if you want to easily override some css or hide some elements on a specific page, using JQuery is really easy and it works well. Of course, the example below is overkill as you can easily use css to do the same thing, I am simply showing that it is possible.

1: make sure you have a link to JQuery in your master page in the HEAD:

<script src="'http://ajax.googleapis.com/ajax/libs/jquery/1.4.2/jquery.min.js'></script>  

2: add a content editor web part to the page you wish to alter

3: use the css() method to target any html tag, css class or id
EXAMPLE:
Say you want to hide the quicklaunch on a page. Use the IE Developer tools to inspect the page and find the outer wrapper for the quicklaunch (.ms-quicklaunchouter). Now add the following code to your content editor web part in code view:


<script>
$(document).ready(function() {
$('.ms-quicklaunchouter').css('display','none');
});

</script>

The area where the .ms-quicklaunchouter is displaying is where you would reference any html tag, ID, or class. ‘Display‘ is where you reference the property, and ‘none‘ is where you reference the value. With this one method you can override pretty much anything on your site.

If you want to override a style across your site collection, create a functions.css file, link it to your masterpage under the initial JQuery link, and put all of your functions there.