Over the past year, my company has enacted a retention policy for documents. Working with a contractor, we came up with a solution to allow users to upload files to SharePoint, select a retention period, and add metadata to the files for easy retrieval. Unfortunately, the solution provided by the consultant did not prove itself to work in action. Our farm admin and myself have created a new solution that appears to be working without the issues associated with the old solution. The original solution that the consultant created relied on custom workflows that paused until the file’s retention period was up, and then deleted the files. The problem was that the deletions never happened. Having thousands of workflows pausing prevented them from actually completing. The new solution uses a custom workflow to set the deletion date for the files, and then uses an Information Management Policy to actually delete the files.
How To:
NOTE: This tutorial assumes that you have intermediate knowledge of SharePoint, know how how to create site columns and content types, lists, and libraries, and are familiar with SharePoint Designer.
Information Management Policies are attached to content types, therefore a content type needs to be created. Before the content type can be created, the custom site columns that the workflows and the policy use must be created.
1: Create Site Columns
The two columns required for this solution are:
- DeletionDate: date/time
- Retention: choice; temp, 1, 3, 5, 7, permanent (these can be whatever retention periods you like)
2: Create Content Type
Create a content type named Retention and add the site columns that should be part of the content type. make sure you include the two site columns that were just created.
3: Create Document Library
If you don’t already have a document library that you want to use, create one now.
4: Attach Content Type to Library
Go to Settings > Advanced Settings in the document library and then click the Yes radio button under "Allow management of content types?". Click OK.
Under Content Types on the Settings screen click on Add from existing content types. Select the Retention content type, click ADD, and then click OK.
Now click on Change new button order and default content type. Set Retention to position 1 default, and remove the existing content type. Click OK.
You can completely remove the original content type by clicking on it and then clicking DELETE.
5: Define the Information Management Policy
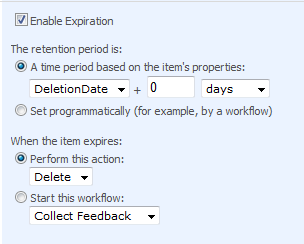
Open the Retention Content Type from the Site Content Types gallery under Site Settings. Click the Information management policy settings link on the Site Content Type screen. Click Define a policy. Click Enable Expiration and then click the radio button next to A time period based on the item’s properties. Select DeletionDate from the first dropdown and enter 0 in the second field. Select Delete as the action to be performed. Click OK.
6: Make sure Expiration Policy is enabled in Central Admin under Timer Jobs
You may need to contact your Farm Admin if you do not have access to Central Administration. Ask them to enable the Expiration Policy timer job. If this is not enabled the files will not delete.
7: Create Workflow
The workflow will check to see what retention period has been selected for an item and then calculate a deletion date for the item.
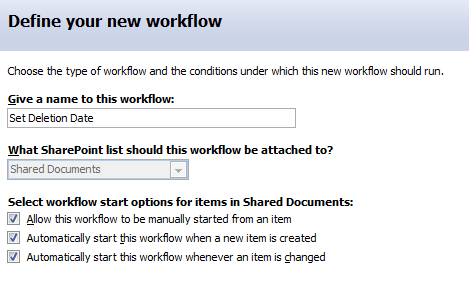
Open SharePoint Designer and then open the site. Go to File > New > Workflow. Name the workflow-I called mine Set Deletion Date. Attach the workflow to the document library. Under start options, I have all of the options selected, though only created and modified need to be selected. Click NEXT.
I have three steps to my workflow. The first step checks the retention period and then adds the period to the created date to calculate the deletion date. The second step checks to see if the deletion date exists in the past, which can happen if you set the initial retention period for an item say in one year, then two days before it deletes you change the retention period to temp, which I have set to only 1 day. The new deletion date would exist in the past, which is probably not what the user intended, so that’s why in step two if the deletion date exists in the past it is recalculated using Modified date as the base instead of Created. The last step checks to see if Deletion Date is set to the calculated date and if so stops the workflow.
Create Workflow Variable
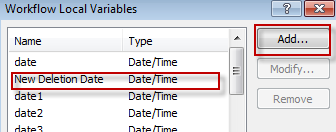
Before the first step can be created a workflow variable called New Deletion Date needs to be created. Click the VARIABLES button at the bottom of the workflow dialog. Click NEW and then enter in the name of the variable and set it to Date/Time. Click OK.
![]()
Step 1: Set Deletion Date
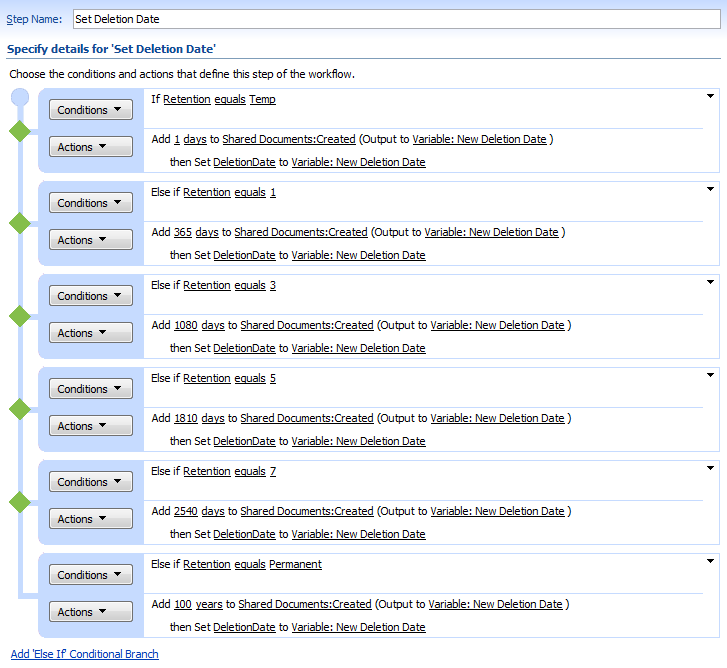
Name the first step in the workflow. For each retention period you have, there will be a condition and two actions.
Condition: compare field –> If Retention (retention field) equals temp (name of a retention period)
Action: add time to date –> Add 1 days to name of document library: Created (output to Variable: New Deletion Date)
Action: set field in current item –> then set DeletionDate to Variable: New Deletion Date
So if you have Retention set to temp for the item, and temp is equal to 1 day, add 1 day to the date the item was created and set that to be the New Deletion Date, then set the value of DeletionDate to be the same as the New Deletion Date.
Repeat these action/conditions for each retention period you have.
UPDATE: Me and math, bah. The day values below are incorrect, here are the correct ones: 3 years = 1095 days; 5 years = 1825 days; and 7 years = 2555 days.
Step 2: Check Deletion Date
Click the Add workflow step link in the right column. Name your second step. For each retention period you have, there will be two conditions and two actions.
Condition: compare field –> If DeletionDate is less than or equal to temp name of document library:Modified
Condition: compare field –> and Retention equals Temp (retention period)
Action: add time to date –> Add 1 days to name of document library: Modified (output to Variable: New Deletion Date)
Action: set field in current item –> then set DeletionDate to Variable: New Deletion Date
So if DeletionDate is less than or equal to the Modified date of the item and you have Retention set to temp for the item, and temp is equal to 1 day, add 1 day to the last modified date and set that to be the New Deletion Date, then set the value of DeletionDate to be the same as the New Deletion Date.
Repeat these action/conditions for each retention period you have.

Step 3: Stop Workflow
I am not 100% sure that this last step is necessary but I am not a fan of infinite loops and I like my workflows to have hard stops in them.
Condition: compare field –> If DeletionDate equals Variable: New Deletion Date
Action: Stop workflow–> Stop the workflow and log Workflow completed (whatever text you want)
The workflow checks to see if the DeletionDate field has been set to the variable New Deletion Date and if so stops the workflow and logs the entered text into the workflow history.

Click the FINISH button to complete your workflow.
Test
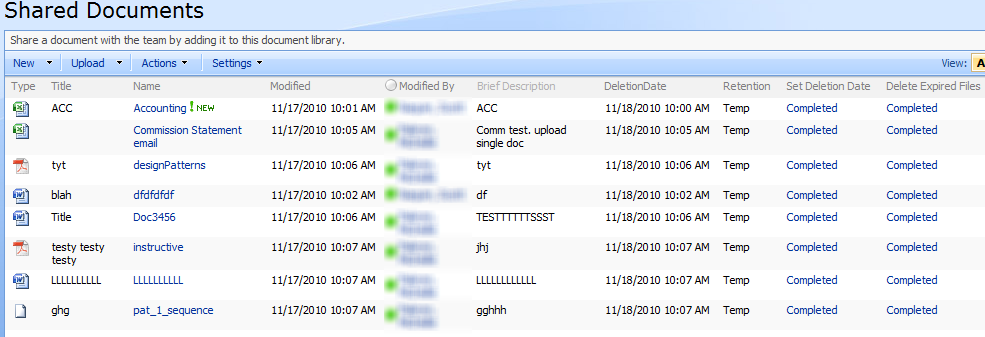
You should now be able to go into your document library, add an item, select a retention period, and the workflow should run and calculate the deletion date for you. Depending on the frequency that the Expiration policy is set, the policy will delete the files that have expired.
There is one glitch we found. If you create a document through the New button or directly in Word and save it into the library, the workflow doesn’t run. The workaround for this is to check the file out and then check it back it-the workflow then kicks off and calculates the deletion date.

Dear mpakron,
I am struggling with the retention policy in my tasks list. I want it to start a workflow, which works just fine (standalone). According to your post the start options “Start workflow automatically when an item is created” and “Start workflow automatically when an item is changed” should be selected in the workflow settings. This doesn’t make sense to me, as the workflow should only be triggered by the timer jobs behind the retention policy. These timer jobs run once a week. I don’t want the workflow to run each time an item is created or changed. Can I just leave all the start options unchecked?
In this post it says that all options should be unchecked: https://social.technet.microsoft.com/Forums/en-US/b0e7577e-adb6-4e63-81ab-fe037dedcd33/forum-faq-sharepoint-workflow-weekly-reminder?forum=sharepointgeneral
Thanks in advance for your help!
Best regards,
Katrin
Hi Katrin, the workflows that I had running here did not cause the files to delete, that was the information management policy. These workflows generated a deletion date. The workflow needs to run when the item is first created in order to create the initial deletion date, and it runs when the item changes in case the retention period is altered and a new deletion date needs to be computed.